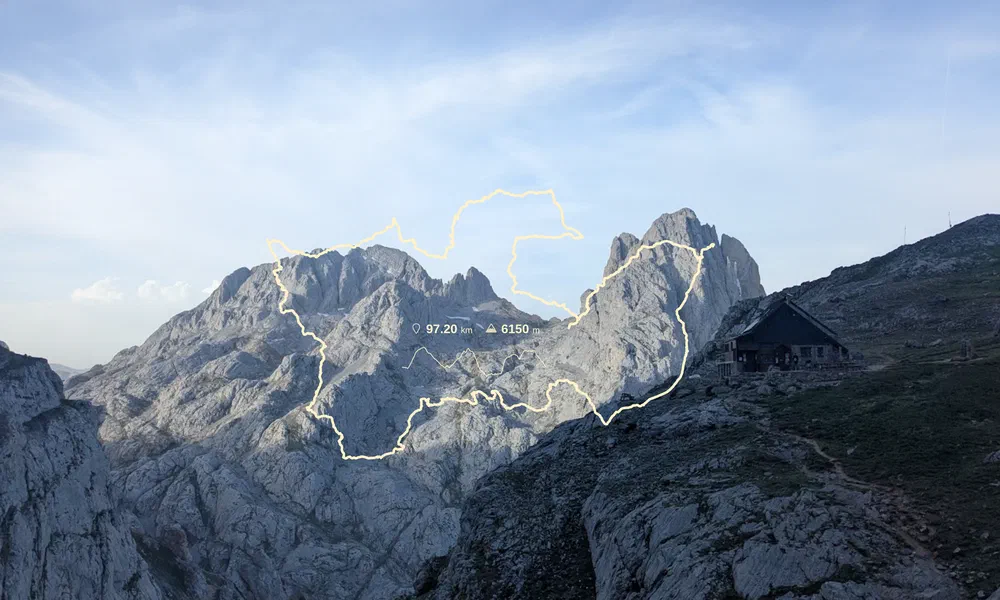
After completing a personalized version of the Anillo de Picos (AP) in the Picos de Europa park in June, I wanted to share this seven-day itinerary, especially since it allows you to see almost the entire park. So if, like me, you only have a week available, this might be an interesting option! I’ll also share all my tips for this beautiful trek.
NB. The GPS tracks are the ones I recorded with my watch, except for the Bulnes section.
To put it briefly, the AP trek can be considered difficult. It’s sometimes compared to the GR20, rightly so in my opinion, at least in terms of technicality.
Water is a real issue since there are few springs and the rivers are often polluted by animals. I recommend carrying at least three liters of water per day, along with a filter or chlorine tablets.
On the other hand, food is very easy to find, since all the staffed refuges offer meals or tapas at reasonable prices (13 to 16€ for a meal). You can even sometimes find really cheap draft beers! We never slept in a refuge, and wild camping is free (unlike the GR20). If you plan to sleep in a refuge, book well in advance on their website.
If you’re afraid of heights, climbing, or chained passages, think twice, as this isn’t a circuit for “beginners”, even though no difficulty is insurmountable.
Finally, be very careful with the paper maps you may find, some (like mine, from Editorial Alpina) are not up to date and will lead you onto dangerous passages. Likewise, double-check any gpx files you find online.
Belgian influencer Floor Denil published a guide that I was able to look at while talking with other hikers, and it seemed to be of very good quality.
One more small note: almost no one speaks English in these mountains, so it’s a good opportunity to brush up on your high-school Spanish!
Legend:
- ⭐ Difficulty level (1 to 3)
- ⛓️ chains present
- 🧗 scrambling/climbing sections
- 💧 water sources available on the stage
If you’re in a hurry, here’s the complete track to download directly. Below, the details of each stage, available to download individually, along with all the accompanying tips.
Day 1 - From Posada de Valdeón to Collado Jermoso refuge
- ⭐⭐ ⛓️ 🧗
- 💧: No water points along the route
- At Collado Jermoso: water, food and toilets
- Download the .gpx file
- View on Komoot
- See the stage “live”
If you’re coming from northern Spain, as I was, Posada de Valdeón is clearly not the easiest town to reach by car. Nevertheless, it’s an excellent starting point, with hotels and restaurants, and a great atmosphere. Many athletes gather there. We left the car in a parking spot for the whole week, even though that’s probably not particularly recommended.
The stage isn’t very technical, despite a chained section fairly early in the day. However, the elevation gain is brutal, with some sections exceeding 45% shortly before the refuge. Watch out, there is no water on this stage, make sure to carry enough.
Day 2 - From Collado Jermoso refuge to Sotres
- ⭐⭐ 🧗
- 💧: Cabaña Verónica (paid); before the Aliva hotel near the sheepfold; at the exit of the abandoned village on the way to Sotres
- Download the .gpx file
- View on Komoot
- See the stage “live”
- At Cabaña Verónica: water (bottled) and food
- At Sotres: hotels, hostel and restaurants
This stage is split into two parts, first reaching the Cabaña Verónica refuge, then starting a long descent towards the village of Sotres.
The first part is certainly one of the most technical of the trip. Between the long scree fields to cross and especially the sections along sandstone ridges that demand constant attention, it’s quite exhausting, but the scenery is worth it.
⚠️ Once past Cabaña Verónica, a path is supposed to lead to the Vega de Uriellu refuge, however it was destroyed in 2023 and is still not secured as of summer 2026. This route is extremely dangerous, we gave up on taking it and instead did the long loop via Sotres, and I encourage you to do the same.
After the refuge, descend towards the Fuente Dé cable car, and turn off before the station, towards the Aliva hotel. Before reaching Sotres, the AP branches off back into the mountains towards the Caseton de Andara refuge. We decided not to follow this route, which would have required an extra day of travel.
Sotres is very touristy, remember to book a room in advance, there is no campsite and wild camping would be difficult near the village. We slept (in a dorm) at the Peña Castil hostel, which we really enjoyed.
Day 3 - From Sotres to Uriellu refuge
- ⭐
- 💧: Terenosa refuge
- Download the .gpx file
- View on Komoot
- See the stage “live”
- At Uriellu: water and food (no toilets if camping)
This stage is one of the easiest technically. You climb up to the Uriellu refuge, passing by the small Terenosa refuge, where you can recharge your batteries and stock up on supplies.
The Uriellu refuge is a major climbing spot, so hikers seem to feel a bit less at home there. If you have the energy, I recommend pushing on to the next refuge, del Jou de los Cabrones, where the welcome seemed better to us. Be careful though, there are several difficulties along the way, so make sure you have the energy required! If you take this option, however, the next day’s stage might be a bit short, unless you decide to go past Bulnes and camp, which can be tricky along the Ruta del Cares.
Day 4 - From Uriellu to Bulnes
- ⭐⭐ ⛓️ 🧗
- 💧: del Jou de los Cabrones refuge
- Download the .gpx file
- View on Komoot
- See the stage “live”
- At Bulnes: hotels and restaurants
The beginning of the day presents a few difficulties, including a small ladder to climb and a windy ridge to cross. At the del Jou de los Cabrones refuge, make sure to regain your strength for what follows, as you’ll again face two beautiful, fairly vertiginous chained passages. Apart from these difficulties, the rest of the day is relatively easy and very enjoyable.
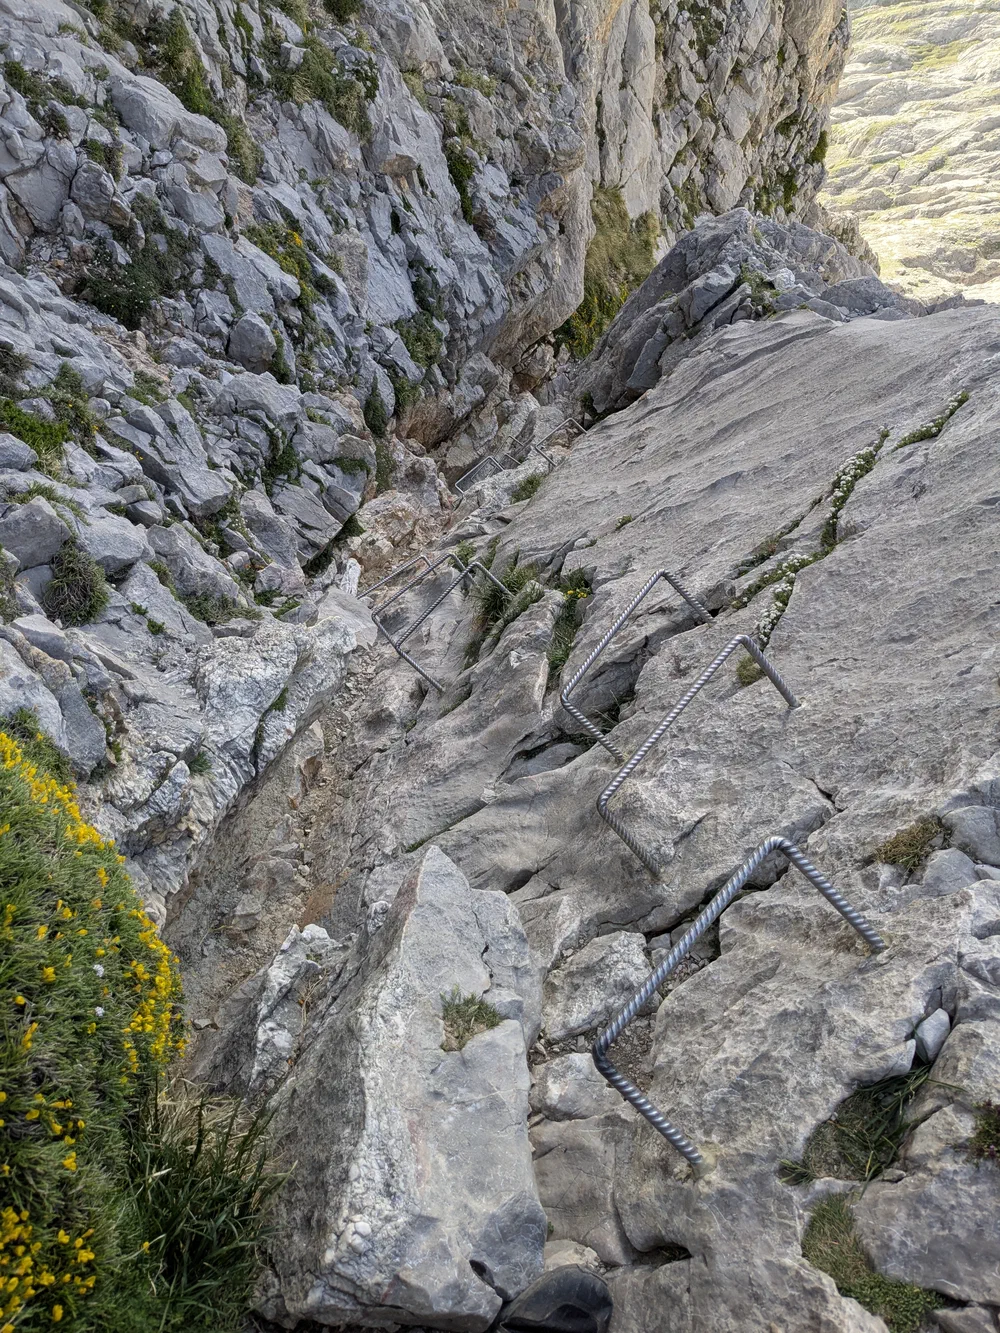
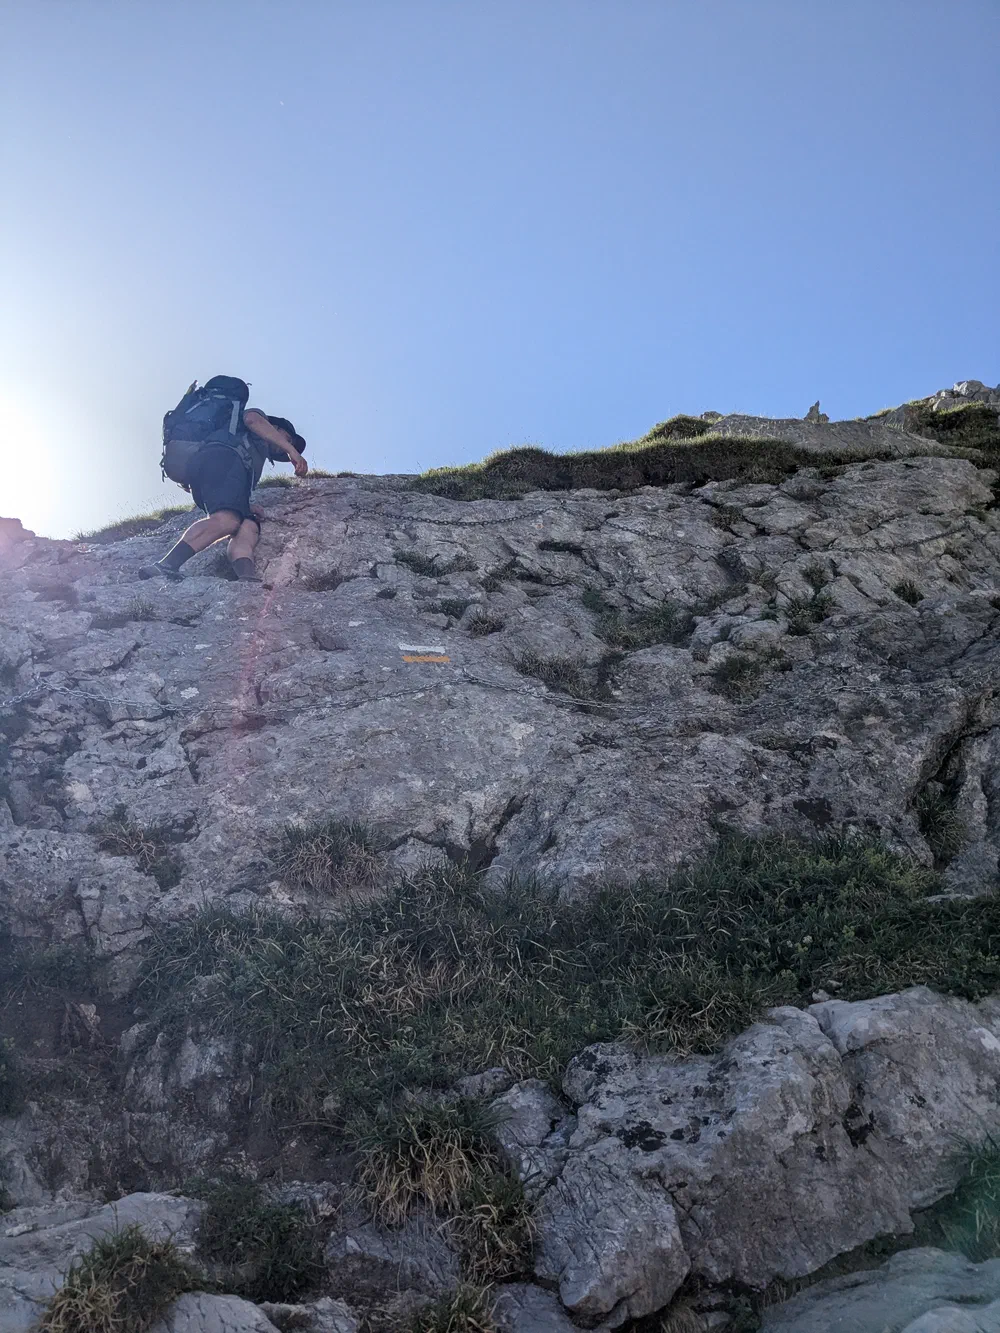
Because of my faulty paper map, we didn’t reach Bulnes, but instead descended via the canal de Piedra Bellida into the gorges, along the banks of the Rio Cares. This route is not suitable at all, nor pleasant. The slope is very steep and you descend through a scree field for two kilometers. If you want to avoid the “detour” via Bulnes at all costs (which is a beautiful village), you can find my track in the “live” article.
Day 5 - From Bulnes to Vega de Ario
- ⭐⭐ 🧗
- 💧: Puente Bollin (after the bridge)
- Download the .gpx file
- View on Komoot
- See the stage “live”
- At Vega de Ario: water and food (no toilets if camping)
Naturally, if you slept in Bulnes, this stage will be long. The first part is fairly easy though, as it consists of following the magnificent Ruta del Cares. When you reach the junction with a very steep path leading up to the refuge, take the time to continue fifty more meters, towards the bridge crossing the gorges: the water source is on the other side.
Then, gather your courage: the climb is very long and difficult. Once you reach the top of the ridge, pay close attention to the route, it’s barely marked, but heads west. So you need to veer off somewhat.
The Vega de Ario refuge is where you’ll find the best food and probably the cheapest draft beer, enjoy it!
Day 6 - From Vega de Ario to Vega Huerta
- ⭐⭐⭐ 🧗
- 💧: Vega de Vegarredonda refuge; Juente Prieta spring (when the yellow “Vega Huerta” markings appear)
- Download the .gpx file
- View on Komoot
- See the stage “live”
- At Vega Huerta: water
This stage is particularly long and difficult for two reasons in particular. The first part, before Vega de Vegarredonda, is hard to navigate. You’ll be amid large rock blocks with several paths crossing each other. The golden rule: follow the red dots.
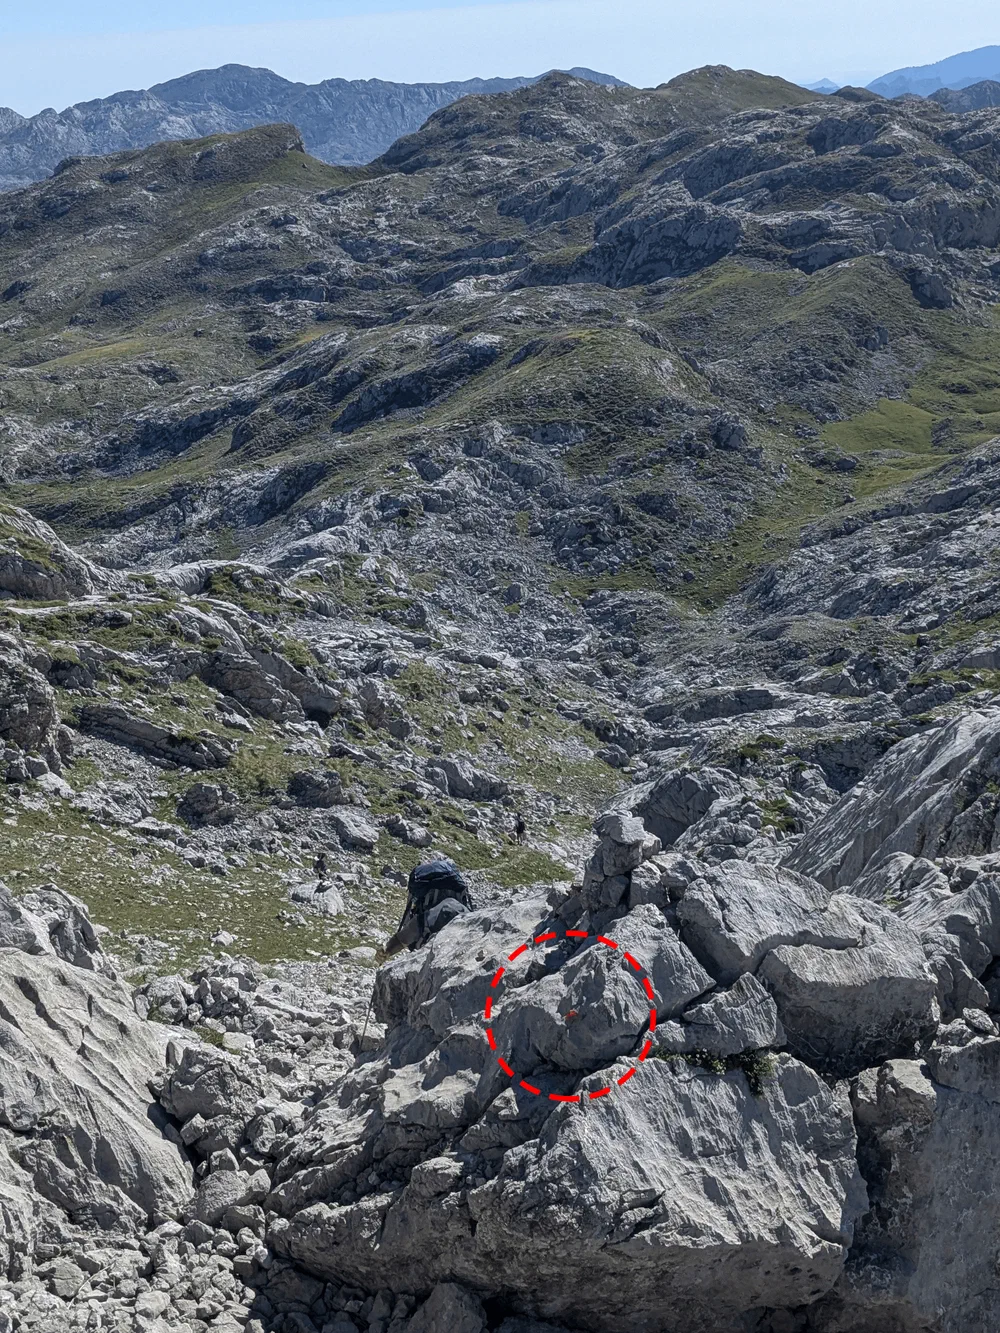
Many cairns will also help you find your way.
After the Vega de Vegarredonda refuge, you climb back up into the very mineral part of the massif. From the spring, past the summit, yellow markings take over to guide you to the refuge. You’ll quickly be surrounded only by sandstone peaks and scree fields. From there on, your patience will be tested, as well as your climbing skills, since several sections are steep and you often walk quite slowly through the scree.
However, the reward matches the effort, since the unstaffed Vega Huerta refuge is charming, as is the surrounding scenery. Be careful, if you plan to sleep inside, it only has four spots, though several camping spots have been set up all around it.
Day 7 - From Vega Huerta to Posada de Valdeón
- ⭐
- 💧: Watering trough at Vega de Llos; watering trough at a bend in the forest track at Argoya
- Download the .gpx file
- View on Komoot
- See the stage “live”
After these six days of hiking, the last stage should feel easy. Despite a few climbs early in the day, it’s mostly a matter of descending all the way back to Posada de Valdeón, where all that’s left to do is enjoy a well-deserved cold beer!